The Need for Microservices
In the early days of software development, applications were built using monolithic architecture, where the entire codebase was present in a single file. This architecture proved to be much more efficient when teams were small and an application had very few services, but it came at the cost of SPOF (Single Point of Failure).
As software development approaches evolved, architecture shifted to "microservices based application," where each function or service was maintained in a separate file. This new architecture came with a lot of benefits, such as scaling services dynamically and independently, and having a variety of tech stack in an application. All microservices communicate with one another using REST APIs.
![]()
Practice Real Kubernetes Skills
Safely learn real foundational and advanced Kubernetes skills in a series of Challenge Labs. Now only $48.
![]()
What are images?
Just like the pictures we take using our camera, photographs capture the state of a particular moment. Similarly, images are the snapshots of a particular application at a particular moment containing the application code and all dependencies. The major advantages for using images is that they are portable, can be loaded onto any machine, and you can do the productive business-defining tasks rather than setting up the system with all required dependencies and configurations. Images are then deployed to create containers.
![]()
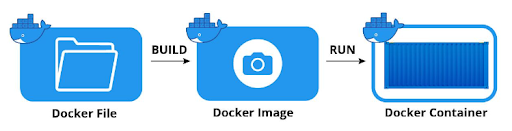
What is Docker?
In a microservices architecture, you use multiple containers to run a single application.
Docker is a tool used to create containers from images.
What is a container registry?
Just like we use GitHub to store our codebase, we have similar registries to store our container images. In Google Cloud, we have Container Registry and Artifact Registry to store our images privately. Storing images in the cloud comes with advantages, such as binary authorization, container analysis to scan for vulnerabilities, and much more.
![]()
What is Kubernetes?
Kubernetes is a production grade container orchestration tool. It's used to deploy your containers by removing the need to manage infrastructure by yourself. Kubernetes is built using the Go programming language and was originally built by Google. We call Kubernetes k8s for short.
You can use Kubernetes in your system by using Minikube, which is a tool that is used to run Kubernetes locally, or by deploying Kubernetes clusters on cloud with just one click.
In Google Cloud we use GKE (Google Kubernetes Engine), in Azure we use AKS, and in AWS we use EKS.
A little background:
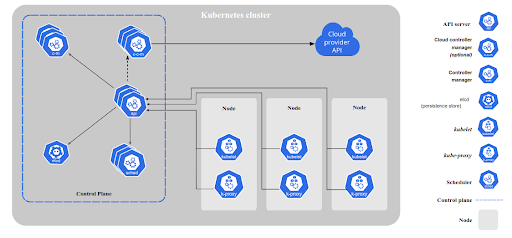
The broader term we use for a single entity of Kubernetes is a cluster. Clusters hold the top rank in the Kubernetes hierarchy. Clusters comprise nodes, pods, secrets, deployments, and much more.
Nodes are the computational objects used to power workloads or processes. You can have any number of nodes as per your specific needs. You can even create multiple worker and master nodes to increase the availability and reliability of the cluster. Nodes are categorized into two types:
- Master Node: This is also known as the control plane. It is the brain of a cluster. It is responsible for maintaining the state of the cluster and logging everything that has to do with your containers. Whenever you execute a command, you interact with the master node, which in turn directs the worker nodes to delegate their tasks. It comprises components like etcd, kube-apiserver, kube-controller-manager, and kube-scheduler, which we will be discussing individually as we move forward.
- Worker Node: This type of node receives instructions from the control plane and is implemented by interacting with Docker Daemon.
Let’s now discuss the core components:
- Kube-apiserver: This is the most important component of the master node. Every single task goes through the API Server. Consider it a REST API that exposes all the features & components of k8s.
- Etcd: This is a NoSQL (key-value) based database that is internally used by the master node to do chores like downloading binaries and making entries for authentication. Its storage is ephemeral by build, which means if you delete your cluster, all of your data will be wiped. Note: Only Kube-apiserver has access to communicate with etcd.
- Kube-controller-manager: This is a pre-configured component of the control plane, which checks for the specifically described state for etcd. It makes sure that there is no difference in state between the current and expected states. It has further components, such as namespace controller and node controller.
- Kube-scheduler: This is a component of the master node that decides which pod goes to which node. It queries at regular intervals to check the list of empty worker nodes, ranks the nodes internally, and deploys the pod to the desired worker node.
- Kubelet: Kubelet is a component of the worker node, and is used to interact with local Docker Daemon under the hood. Kubelet acts as a bridge between Docker Daemon and kube-apiserver.
- Kubectl: This is an HTTP client that provides a way to issue commands to the kube-apiserver. The flow works like this:
- You enter the kubectl command.
- Kube-apiserver will receive the HTTP request.
- Kube-apiserver will make an entry in the etcd database and will return the desired output.
You can learn more about core components in the Kubernetes Documentation.
Now that you know the core components, let's take a look at what else Kubernetes offers.
- Containers: These are the workloads you want to deploy.
- Pods: A pod is the smallest deployable unit in all of Kubernetes. A pod can have one or more containers, but all the containers that belong to the same pod will be launched on the same worker node and will share the same resources, like volumes. Generally, we deploy a single container inside a pod, but we can deploy another container using the sidecar pattern or the ambassador pattern. Pods are scheduled on the nodes, which are scheduled by the kube-scheduler component of the control plane. Each pod gets a private IP address and the containers inside the same pod communicate with each other using localhost. Note: Pods are ephemeral i.e. their lifecycle is temporary. If they get stopped due to either maintenance issues or some internal configuration, the pod will get recreated by kube-controller-manager, but with a new IP address.
- Nodes: These are the computational resources for deploying your workloads.
- Services: As we discussed, the IP addresses of pods are private and ephemeral. Services act as a medium of abstraction by providing a static IP address. All the pods with matching labels and selectors are assigned to the same service. In case any pod fails, there is no effect on the end user IP address.
There are 3 types of services: - NodePort: This is the most used type of service to expose your pods to external traffic.
- ClusterIP: This type of service is meant for private communication between pods.
- LoadBalancer: This type of service is only supported in Cloud-based Kubernetes solutions. It automatically creates a load balancer and attaches it to the pods.
- Ingress: As every human can’t remember the IP addresses of every service, Ingress is used to map the service IP address with the domain name.
- ReplicaSets: ReplicaSets will create a number of identical resources, you just need to provide a template for the pods.
- Deployments: These are generally known as the blueprint of your deployment. These are built on top of ReplicaSets to provide a controlled method to update your pods.
- Namespaces: These help in enhancing the efficiency of your team by grouping the resources as per the team, environment, or application. As soon as you launch the cluster, a namespace with the name default is automatically created.
Now that we've gone over Kubernetes basics, let's explore the cloud-based solution for Kubernetes, Google Kubernetes Engine.
Kubernetes in Google Cloud
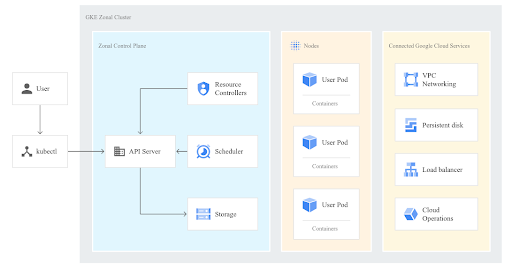
Google Kubernetes Engine is a cloud-based managed solution of Kubernetes. GKE works similar to Kubernetes, but comes with the advantages of the cloud, including high availability, scalability, and affordability. Just create a cluster type of your choice and deploy your containers.
Types of Clusters and Modes:
- Autopilot Mode: This is the new and recommended mode for creating clusters. In this mode, you just define your location and deploy your workloads, and Google will take care of the rest starting from the node configuration to the security of the cluster.
- Standard Mode: This mode gives you room to decide the configuration of the clusters by yourself and deploy your application by managing the underlying infrastructure according to your needs.
- Private Cluster: This type of cluster is used when you don’t want to expose your nodes, pods, or deployments to external traffic.
- Public Cluster: This type of cluster is created by default.
- Zonal Cluster: Zonal clusters are segmented into single zone and multi zonal clusters. Single zone clusters are meant for scheduling your master node only in one zone, whereas multi zonal clusters are used when you want a single replica of your master node in some other zone, with the worker nodes running in multiple zones.
- Regional Cluster: Regional clusters have multiple replicas of worker and master nodes running in multiple zones within a region.
- Alpha Cluster: These types of clusters have all Kubernetes alpha APIs enabled. Alpha clusters are not supported for production workloads, cannot be upgraded, and expire within 30 days.
List of commands:
- kubectl get namespace/pod/service/deployment - retrieves a list of each respective resource
- kubectl run <NAME-OF-POD> --image=<IMAGE> - runs a pod with a particular image
- kubectl create deployment <NAME> --image=<IMAGE> - creates a deployment
- kubectl expose deployment <NAME> --type=LoadBalancer --port=8080 - exposes the created deployment to the outside world
- kubectl apply -f <FILE-NAME>.yaml - creates resources using a YAML file.
Running sample application on GKE
1. Log into your Google Cloud account.
2. Search for Kubernetes Engine in the search panel and select the service.

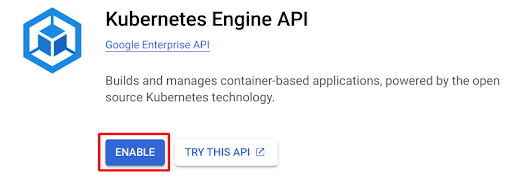
3. If you're using Kubernetes for the very first time, you need to enable Kubernetes Engine API.
4. Select the standard cluster mode and enter the name of the cluster.

5. Select the zonal cluster type and choose the zone nearest to you.

6. Google Cloud will create a default node pool for you, but you can add more node pools as desired. Node pools help manage different machine configurations together. You can edit the node pool by clicking on it.
7. You can enable auto scaling of nodes under the automation section. Play around with the rest of the settings and then click create. Note: The creation of the cluster will take around 5-7 minutes.
8. The rest of the steps will be implemented using the command line, so click on the Cloud Shell Icon present in the top panel.

9. In order to connect to the cluster, we need to make an entry in the etcd database. We will do this by using the kubectl command, which in turn will send a HTTP request to the kube-apiserver, which will then make an entry in the etcd database confirming your identity.
gcloud container clusters get-credentials <CLUSTER-NAME> --zone <ZONE> --project <PROJECT-ID>
10. Now that we are connected to the cluster, let’s spin up our first pod.

11. You can check the active running pods by using the kubectl get pod command.

We will be exposing the pods to the external world in our upcoming series of blogs.
NOTE: Delete all the resources, as keeping the resources idle will incur costs.
Learning Kubernetes and earning Google Cloud certifications opens up huge career opportunities. Ready to start earning Google Cloud certifications? We’ll give you a coach and help you pass the exam the first time—guaranteed.