If you know anything about Google Cloud, then you may have heard of its serverless computing function. The buzz around serverless is substantial! Its renown has only been made possible via the cloud vendors and their internal algorithms, which work remarkably in predicting and managing both current and future workloads. Google Cloud comes with a variety of serverless features, and today we’ll take a dive into some of them.
But before that, let’s go over some basics.
What is Serverless?
This term may sound bewildering at first! Your initial thought may be, “How can there be a service that doesn’t utilize servers?”
The term “serverless” can be a bit misleading, as there are in fact servers involved. The catch here is that the cloud acts as an abstraction and manages all the infrastructure through its internal algorithms. By using serverless services or architecture, you simply deploy your workload or application; the provisioning, maintaining, and scaling will be taken care of by the cloud provider, which will also manage components ranging from infrastructure to data management.
Google Cloud Certification Bootcamp
Earn Associate Cloud Engineer and Professional Architect certifications at the same time—and get 2 hours of 1:1 coaching with a GCP expert.
See detailsThere are already numerous examples of serverless services in Google Cloud. For instance, for storage we use Google Cloud Storage, for container computing we use Cloud Run, the list could go on.
Serverless services can scale up to N Machines, or scale down, even to zero, depending on traffic. The major advantage of these services is the pay-as-you-go model. With this model, you only pay for the time for which you used the resources, not for the duration for which you provisioned them. There is no need to pre-provision resources in advance in order to meet the future predicted workload.
With that all covered, let’s discuss some pros and cons for choosing serverless services.
|
Pros |
Cons |
|
|
What is Autoscaling?
Let’s break the word into its components: Auto + Scaling. Auto means automated, and scaling is something that can be increased or decreased.
Generally in cloud computing, autoscaling is described as increasing or decreasing the number of resources (Virtual Machines, or VMs) as per demand.
- Scale up or scale out: increasing the current capacity by adding more resources.
- Scale down or scale in: decreasing the capacity by reducing the amount of current resources.
You just need to define the autoscaling policy, in which you specify the resource and hard limit (max and min resources).
In Google Cloud we generally use MIGs (Managed Instance Groups) for exercising autoscaling. Here we can define autoscaling based on conditions such as CPU utilization and memory consumption, and define the maximum and minimum number of instances. If the threshold is met, more VMs are added. If it has not been met, the number of VMs is reduced to the defined minimum number of instances. In the cloud industry we have broadly categorized autoscaling into 3 categories.
Types of Autoscaling:
- Horizontal Autoscaling: here we hike or reduce the number of resources
- Vertical Autoscaling: here we increment or decrement the size (memory/cpu) of resources
- Multi-dimension Autoscaling: horizontal scaling (based on CPU) and vertical scaling (based on memory) are used at the same time
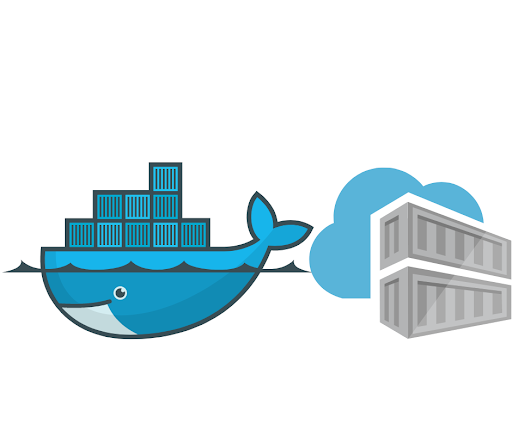
What is a Container Image?
Imagine a container image as a template file that contains all the components to run a particular application. For example, a Dockerfile is a text document that contains all the commands a user needs in order to assemble an image. The major advantage of using Dockerfile is that it is portable and light-weight.
Now that we've gone over the basics, let’s take a dive into the Google Cloud serverless service.
What is App Engine?
App Engine is a fully managed service (infrastructure managed by Google Cloud) offered by Google Cloud to deploy monolithic applications, web applications, or multiple services in a single application.
If by any chance any of your machines go down, you don’t have to worry about bringing them back up. Google Cloud will do this task for you.
The major advantage of adopting App Engine is that it offers advanced features like traffic splitting and versioning with just a click of button. As this service is fully managed, you can easily scale your service from N to 0 and 0 to N instances.
Google Cloud offers this service in 2 formats:
- Standard: In this format, your application can scale down to 0 instances (at the backend every task is performed by instances) thus making your solution cost efficient. As you can scale your instances to 0, the scaling is done very rapidly. The only problem here is the limited runtime environment (Go, Java, PHP, Python, Ruby, and Node.js); you can only deploy an application using a certain set of languages.
- Flexible: This format type supports more runtime environments with custom runtimes and .NET runtime, in addition to those of the standard format. The only potential disadvantage is that AT LEAST one instance needs to be running at all times, thus causing the pricing to go a lot higher. As there should be at least 1 instance running, the scaling takes a little longer than the standard.
Types of Autoscaling in App Engine:
- Basic: In this type, instances are created when there is need and are shut down when there is no workload.
- Manual: As you can probably guess by the name, the scaling is done manually. You define the instances and it will run the same number of instances regardless of the workload.
- Automatic: Instance-based parameters such as latencies will be created dynamically. This is the default autoscaling type.
NOTE: Basic Autoscaling is not supported in App Engine Flexible.
Let’s explore the core components of App Engine.
Components of App Engine:
- Service: These are the collection of functionalities of your application. For example, if you are building an e-commerce website, you will be building a product catalog service, a user details service, and so on. All these functionalities are created as a service in App Engine, and by default these services can communicate with each other like microservices.
- Version: This is the major advantage of using App Engine. This component allows you to run multiple versions of a single app, apply traffic splitting, perform A/B testing based on different sets of users, and easily create different environments such as development, testing, staging, and production.
- Instance: These are the smallest units of computation in App Engine. They are used under the hood to perform your workloads. These are scaled up and down as per the load (managed by Google Cloud).
In terms of Security, App Engine is tightly integrated with Cloud Logging, Cloud Monitoring and Cloud IAP. Logging and monitoring can be used to troubleshoot the application, while Cloud IAP can be used to restrict the incoming traffic to your application.
If you are still uncertain as to which environment (standard/flexible) to pick, kindly refer to the Official Google Cloud Documentation.
For more info on billing, you can head to the Google Cloud Pricing Calculator.

What is Cloud Run?
This service is best suited for the clients who have shifted from monolithic to microservice architecture, or who want to deploy an application built using any language, library, or binary, and are looking for a managed, serverless solution to manage their stateless workloads. This service is also a good fit for the customers who are lacking an experienced professional team to manage their container infrastructure. The major uses for Cloud Run are for event driven applications, web applications, APIs, and microservices. An advantage of using this service is that it provides advanced traffic splitting features accompanied by easy rollback and versioning.
For deploying an application, you just need to define the URL of the container image, enter the service name, a region, and the max/min number of instances.
One interesting fact about Cloud Run is that it has a built-in internal load balancer to distribute the load evenly across containers, thus achieving serverless nature.
Cloud Run is mostly used for running stateless workloads, though you can make the data persistent by integrating Cloud Run with services like Cloud Spanner or Google Cloud Storage.
In terms of security, you can use Secret Manager to store secrets and Binary Authorization to check for any vulnerability in the container image.
The most interesting fact about Cloud Run is its pricing. You are billed based on the amount of time you used the resources, rounded off to the 100th second. In the free tier, Google Cloud doesn’t charge you for: first 180,000 vCPU-seconds/month, first 360,000 GiB-seconds/month, 2 million requests/month.
For more accurate pricing you can refer to the Google Cloud Pricing Calculator.
Cloud Run is offered in 2 formats:
- Cloud Run Service: deploy code that will run and respond to events
- Cloud Run Jobs: deploy code that will stop after the job is done
Deploying a Service on Cloud Run:
- Log into your Google Cloud Account.
- Head towards the Cloud Run Service.
- Enable the Cloud Run API.
- For demonstration purposes, enter the container image URL as us-docker.pkg.dev/cloudrun/container/hello, service name as hello-learners, and choose the region nearest to your geographic location.
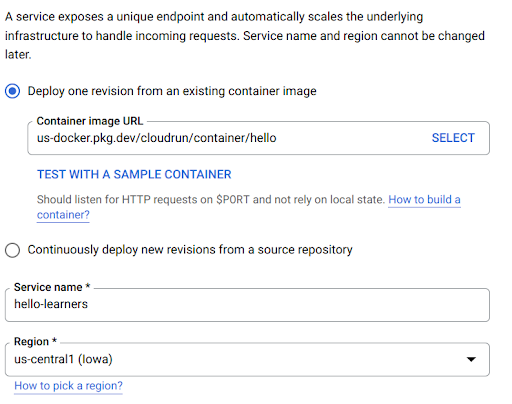
- Leave the rest of the settings as the default and enter the maximum number of instances to 10, as the workload we are going to default isn’t that compute intensive.
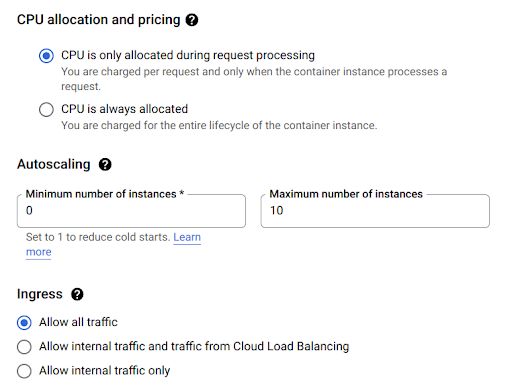
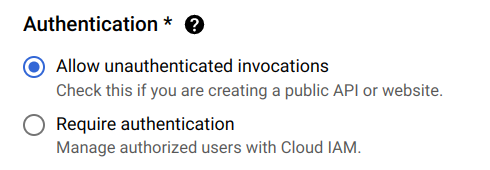
- For authentication, select allow unauthenticated invocations.
- After successful creation, copy the endpoint URL of the service.

- Paste the URL in a new tab and you should receive an amazing graphic as the output.
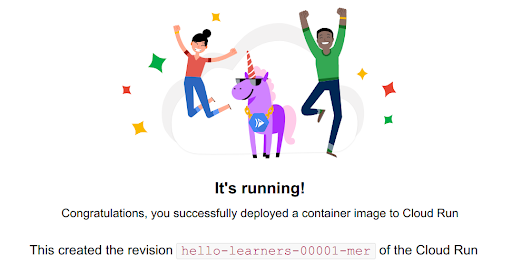
You have successfully created a Cloud Run Service within a few minutes.
What are Cloud Functions?
Apart from IaaS, PaaS, and SaaS, another service that is used in the day-to-day functioning of a cloud engineer is Faas (Function as a Service).
Think of Cloud Functions as a grocery store, where you give the grocery list to the vendor and in return the vendor provides you with the groceries. Similarly, in Cloud Functions you define the workload, it computes the workload and returns the desired output. Whether you want to send data from cloud storage to BigQuery or count the number of VMs running, cloud functions can do nearly every task for you.
Technically speaking, Cloud Functions can be described as a lightweight, event-based, asynchronous compute solution that allows you to create small, single-purpose functions that respond to cloud events without the need to manage a server or a runtime environment.
In Cloud Functions you can write code in various languages like Python or Go and deploy the code with just one click.
In the backend, a Cloud Provider creates a container (for now, imagine a container as a small process that is scheduled to run on a VM) and spins up the container.
One thing to keep in mind while dealing with Cloud Functions is that they are ephemeral; in order to store the output, you need to integrate it with some storage options.
The only disadvantage of using Cloud Functions is that everything within a function must be defined.
1st Gen vs 2nd Gen:
Recently, Google Cloud launched the 2nd gen cloud functions. Currently, cloud functions are differentiated into 1st gen and 2nd gen.
2nd gen is the new version of cloud functions, backed by Cloud Run and Eventarc. As it is built on top of cloud functions, it inherits the advantages of Cloud Run, like traffic splitting in the functions and a longer timeout of up to 60 minutes.
For a better overview of 1st gen and 2nd gen cloud functions, you can refer to the Official Google Cloud Documentation.
Working with Cloud Functions:
For the sake of simplicity, we will only be looking at 1st gen cloud functions.
- Log into your Google Cloud account.
- Head towards the Cloud Functions Service.

- Enable the Cloud Function API.
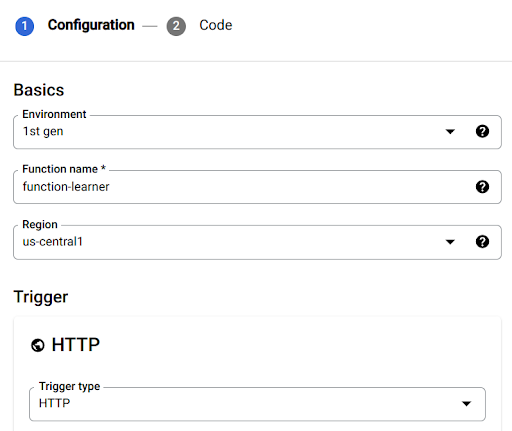
- Select the Environment as 1st gen; the function name can be any name.
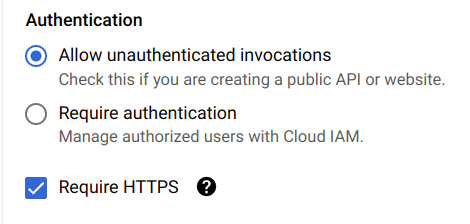
- For authentication, select allow unauthenticated invocations.
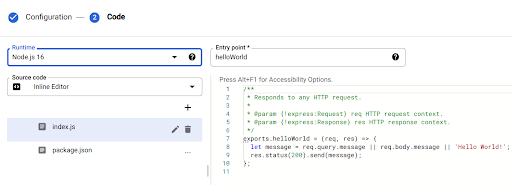
- By default, your code should be pre-populated with a sample Hello World code. Click on deploy in order to work with Cloud Functions.
- Under Triggers, copy the URL to invoke the Cloud Function
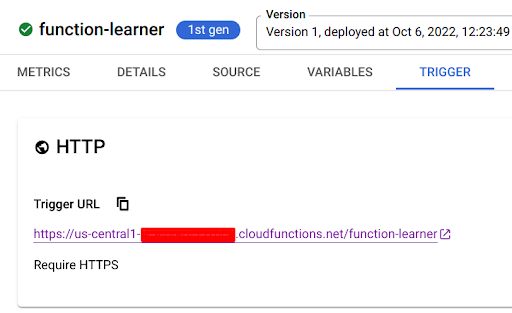
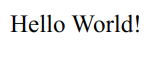
- Paste the URL in a different tab and you will receive Hello World! as the output.
Ready to learn more and earn in-demand GCP certifications? We’ll give you a coach and help you pass your Google Cloud certification exam the first time—guaranteed.